1. CloudFront

CloudFront는 정적, 동적 컨텐츠를 빠르게 응답하기 위한 캐시 기능을 제공하는 CDN 서비스입니다.

캐싱을 지원하기 때문에 S3에 저장된 컨텐츠를 직접 접근하지 않아도 됩니다.

따라서 S3의 비용이 감소하며, 더 빠른 응답을 지원하므로 꼭 함께 적용해주는 것이 좋습니다.


2. 퍼블리싱

src/main/resources/templates/gallery.html

<body>
    <h1>파일 업로드</h1> <hr>

    <form th:action="@{/gallery}" method="post" enctype="multipart/form-data">
        제목 : <input type="text" name="title"> <br>
        파일 : <input type="file" name="file"> <br>
        <button>등록하기</button>
    </form>

    <hr>

    <div th:each="gallery : ${galleryList}">
        <div style="margin-bottom: 30px">
            <p th:inline="text">제목 : [[${gallery.title}]]</p>
            <img th:src="${gallery.imgFullPath}" style="width: 500px; height: 300px;">
        </div>

        <form th:action="@{/gallery}" method="post" enctype="multipart/form-data">
            <input type="hidden" name="id" th:value="${gallery.id}">
            <input type="hidden" name="title" th:value="${gallery.title}">
            <input type="hidden" name="filePath" th:value="${gallery.filePath}">
            파일 : <input type="file" name="file"> <br>
            <button>수정하기</button>
        </form>
        <hr>
    </div>

</body>
  • 기존에 존재하던 gallery.html 파일에 갤러리 정보를 노출하는 영역과 수정 영역을 추가했습니다.
  • hidden 값인 id, title, filePath는 이미지 수정시 사용하는 값이므로 같이 넘겨줍니다.


3. 이미지 조회

1] 이미지 조회 - Controller

src/main/java/com/victolee/s3exam/controller/GalleryController.java

@GetMapping("/gallery")
public String dispWrite(Model model) {
    List<GalleryDto> galleryDtoList = galleryService.getList();

    model.addAttribute("galleryList", galleryDtoList);

    return "/gallery";
}
  • 기존에 존재하던 dispWrite() 메서드를 수정하여, 갤러리 목록을 가져옵니다.


2] 이미지 조회 - S3Service

S3에 이미지를 조회하는 방법으로 AmazonS3Client.getObject() 메서드가 있지만, 이는 S3에 직접 요청하여 객체를 가져옵니다.

여기서는 S3에 직접 접근하는 것이 아닌, CloudFront을 통해 캐싱된 이미지를 가져올 것이므로 해당 메서드를 사용하지 않습니다.


src/main/java/com/victolee/s3exam/service/S3Service.java

public static final String CLOUD_FRONT_DOMAIN_NAME = "dq582wpwqowa9.cloudfront.net";

...

public String upload(MultipartFile file) throws IOException {
    String fileName = file.getOriginalFilename();

    s3Client.putObject(new PutObjectRequest(bucket, fileName, file.getInputStream(), null)
            .withCannedAcl(CannedAccessControlList.PublicRead));

    return fileName;
}
  • 기존에 존재하던 upload() 메서드를 수정합니다.
  • CLOUD_FRONT_DOMAIN_NAME


3] 이미지 조회 - GalleryService

src/main/java/com/victolee/s3exam/service/GalleryService.java

public List<GalleryDto> getList() {
    List<GalleryEntity> galleryEntityList = galleryRepository.findAll();
    List<GalleryDto> galleryDtoList = new ArrayList<>();

    for (GalleryEntity galleryEntity : galleryEntityList) {
        galleryDtoList.add(convertEntityToDto(galleryEntity));
    }

    return galleryDtoList;
}

private GalleryDto convertEntityToDto(GalleryEntity galleryEntity) {
    return GalleryDto.builder()
            .id(galleryEntity.getId())
            .title(galleryEntity.getTitle())
            .filePath(galleryEntity.getFilePath())
            .imgFullPath("https://" + s3Service.CLOUD_FRONT_DOMAIN_NAME + "/" + galleryEntity.getFilePath())
            .build();
}
  • convertEntityToDto() 메서드는 Controller <--> Service 통신 간에 dto 객체를 사용하기 위해, repository로 부터 얻은 entity 객체를 dto로 변환하는 메서드입니다. 
    • .imgFullPath("https://" + s3Service.CLOUD_FRONT_DOMAIN_NAME + "/" + galleryEntity.getFilePath())​
      • 앞에서도 언급했지만 파일을 업로드할 때, 파일명만 DB에 저장하므로 이는 S3 객체의 key 값이 됩니다.
      • s3Service에 정의된 상수(CLOUD_FRONT_DOMAIN_NAME)를 불러와서 "CloudFront URL + key"를 조합하여 이미지 full path를 dto에 정의합니다.


4] 이미지 조회 - GalleryDto

src/main/java/com/victolee/s3exam/dto/GalleryDto.java

private String imgFullPath;

...

@Builder
public GalleryDto(Long id, String title, String filePath, String imgFullPath) {
    this.id = id;
    this.title = title;
    this.filePath = filePath;
    this.imgFullPath = imgFullPath;
}
  • 멤버 변수 imgFullPath를 추가하고, 빌더에도 정의해줍니다.


6] 이미지 조회 - GalleryRepository

src/main/java/com/victolee/s3exam/domain/repository/GalleryRepository.java

public interface GalleryRepository extends JpaRepository<GalleryEntity, Long> {
    @Override
    List<GalleryEntity> findAll();
}


5] 이미지 조회 - 테스트


이미지를 업로드하고 개발자도구로 src 애트리뷰트를 확인해보면 CloudFront URL로부터 이미지를 가져온 것을 확인할 수 있습니다.


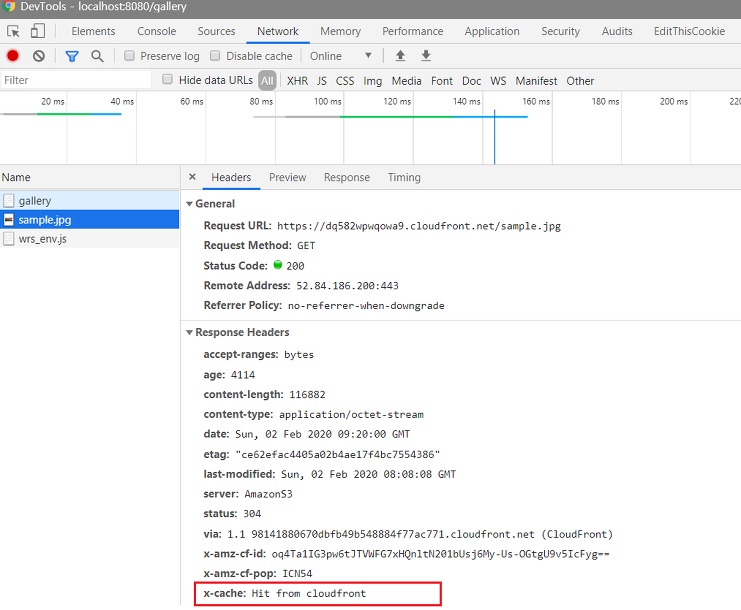
"개발자 도구 - Network" 탭에서 Response Headers 정보를 살펴보면 cloudfront에서 Cache가 Hit된 것을 확인할 수 있습니다.


4. 이미지 수정/삭제


이미지 수정은 업로드와 마찬가지로 putObject() 메서드를 사용하여 객체를 수정합니다.

따라서 아무런 코드를 수정하지 않고 S3 이미지를 수정할 수 있습니다.


그런데 파일명이 같은 이미지를 수정했을 경우, S3에는 정상적으로 수정된 이미지로 업로드가 되지만 CloudFront는 캐시되어 있는 상태이므로 페이지에 새로운 이미지로 반영되지 않습니다.

CloudFront 배포 설정에 따라 캐싱되는 시간에 차이가 있는데, 기본 값은 1일 입니다.

어쨋든 이미지를 수정했음에도 바로 반영이 안되므로 이는 서비스 운영 관점에서 이슈입니다.


따라서 이를 해결하려면 아래의 작업이 필요하며, 그 이유는 다음과 같습니다.

  • 고유한 파일명(객체의 key)으로 S3에 업로드
  • 업로드 시, 해당 키의 객체가 존재하면 삭제 후 업로드


1] 이미지 수정/삭제 - Controller

src/main/java/com/victolee/s3exam/controller/GalleryController.java

@PostMapping("/gallery")
public String execWrite(GalleryDto galleryDto, MultipartFile file) throws IOException {
    String imgPath = s3Service.upload(galleryDto.getFilePath(), file);
    ...
}
  • service.upload()를 호출할 때, 기존의 파일명을 파라미터로 전달합니다.
  • 이 값은 gallery.html에 hidden 값으로 정의되어 있습니다.


2] 이미지 조회 - S3Service

src/main/java/com/victolee/s3exam/service/S3Service.java

public String upload(String currentFilePath, MultipartFile file) throws IOException {
    // 고유한 key 값을 갖기위해 현재 시간을 postfix로 붙여줌
    SimpleDateFormat date = new SimpleDateFormat("yyyymmddHHmmss");
    String fileName = file.getOriginalFilename() + "-" + date.format(new Date());

    // key가 존재하면 기존 파일은 삭제
    if ("".equals(currentFilePath) == false && currentFilePath != null) {
        boolean isExistObject = s3Client.doesObjectExist(bucket, currentFilePath);

        if (isExistObject == true) {
            s3Client.deleteObject(bucket, currentFilePath);
        }
    }

    // 파일 업로드
    s3Client.putObject(new PutObjectRequest(bucket, fileName, file.getInputStream(), null)
            .withCannedAcl(CannedAccessControlList.PublicRead));

    return fileName;
}
  • fileName 변수
  • doesObjectExist()
  • putObject()


2] 테스트


1) 기존 파일


2) 수정 업로드


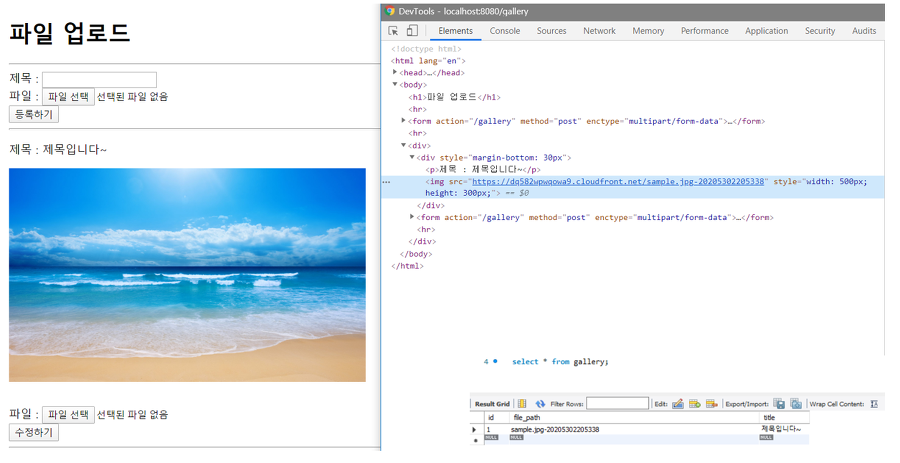
동일한 파일명이지만 다른 그림을 업로드 했을 때, postfix로 인해서 CloudFront의 Cache가 적용되지 않은 것을 확인할 수 있습니다.

DB에도 잘 key값이 잘 반영되었네요.


3) S3에서 delete 되었는지 확인


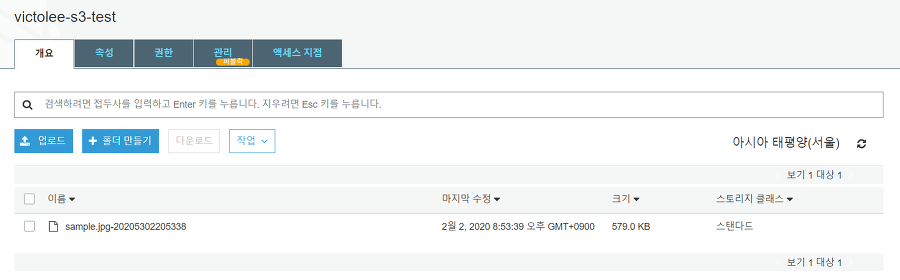
신규/수정 업로드를 각각 수행했지만, 최종적으로는 마지막에 업로드한 파일만 존재하고 있는 것을 확인할 수 있습니다.

이상으로 Cloud Front를 적용했을 때 S3에 파일 업로드/조회 하는 방법에 대해 알아보았습니다.


출처: https://victorydntmd.tistory.com/336

Exception in thread "main" java.lang.IllegalAccessError: tried to access method org.apache.poi.util.POILogger.log(ILjava/lang/Object;)V from class org.apache.poi.openxml4j.opc.PackageRelationshipCollection
    at org.apache.poi.openxml4j.opc.PackageRelationshipCollection.parseRelationshipsPart(PackageRelationshipCollection.java:313)
    at org.apache.poi.openxml4j.opc.PackageRelationshipCollection.<init>(PackageRelationshipCollection.java:163)
    at org.apache.poi.openxml4j.opc.PackageRelationshipCollection.<init>(PackageRelationshipCollection.java:131)
    at org.apache.poi.openxml4j.opc.PackagePart.loadRelationships(PackagePart.java:561)
    at org.apache.poi.openxml4j.opc.PackagePart.<init>(PackagePart.java:109)
    at org.apache.poi.openxml4j.opc.PackagePart.<init>(PackagePart.java:80)
    at org.apache.poi.openxml4j.opc.PackagePart.<init>(PackagePart.java:125)
    at org.apache.poi.openxml4j.opc.ZipPackagePart.<init>(ZipPackagePart.java:78)
    at org.apache.poi.openxml4j.opc.ZipPackage.getPartsImpl(ZipPackage.java:243)
    at org.apache.poi.openxml4j.opc.OPCPackage.getParts(OPCPackage.java:684)
    at org.apache.poi.openxml4j.opc.OPCPackage.open(OPCPackage.java:275)
    at org.apache.poi.util.PackageHelper.open(PackageHelper.java:37)
    at org.apache.poi.xssf.usermodel.XSSFWorkbook.<init>(XSSFWorkbook.java:266)


Excel Download 해당 오류 경우

Dependency poi version을 맞춰주면 에러가 해결된다.


<properties>

<poi.version>3.13</poi.version>

</properties>


<dependencies>

<dependency>

<groupId>org.apache.poi</groupId>

<artifactId>poi</artifactId>

<version>${poi.version}</version>

</dependency>

<dependency>

<groupId>org.apache.poi</groupId>

<artifactId>poi-scratchpad</artifactId>

<version>${poi.version}</version>

</dependency>

<dependency>

<groupId>org.apache.poi</groupId>

<artifactId>poi-ooxml</artifactId>

<version>${poi.version}</version>

</dependency>

<!-- etc as needed -->

...

</dependencies>

@RequestMapping의 produces 속성을 이용해 Response의 Content-Type을 제어할 수 있다


한국관광공사가 제공하는 TourAPI를 사용하면서 지역코드(area_code)로 지역명(area_name)을 조회하는 간단한 요청에서 encoding 문제에 부딪혔다. 아래와 같이 ajax 요청으로 areaCode를 보내면 서버에서 areaName을 return하는 식이다. 예를 들면, areaCode로 1을 보내면 서버는 "서울"을 응답해야 한다. 그런데 "서울"이 "??"로 출력되는 인코딩 문제가 발생했다.


1
2
3
4
5
6
7
8
9
10
11
12
13
14
$(function() {
    $.ajax({
        url: '/travel/getAreaName',
        method: 'get',
        data: {areaCode:'${content.area}'},
        dataType:"text",
        error:function(textStatus) {
            console.log(textStatus);
        },
        success:function(areaName) {
            console.log('선택된 지역 이름 : ' + areaName);
        }
    });
});
cs


이때까지 @ResponseBody를 사용하여 문자열을 return할 때 영어만 사용했어서 인코딩 문제를 겪지 않았었다. @RequestMapping의 produces 속성을 아래와 같이 작성하면 해결할 수 있다.


1
2
3
4
5
6
7
8
9
10
11
12
/**
 * 지역코드(areaCode)로 지역명을 조회한다
 * @param areaCode
 * @param resp
 * @return
 */
@RequestMapping(value="/getAreaName"
                method=RequestMethod.GET, 
                produces="application/text;charset=utf-8")
public @ResponseBody String getAreaName(@RequestParam int areaCode) {
    return tourApiModule.getAreaName(areaCode);
}
cs


아래는 produces 속성을 작성하지 않았을 때 Response Header의 Content-Type이다.


아래는 produces 속성을 작성한 후 Content-Type이 변경되어 응답하는 것을 확인할 수 있다.


출처: http://bigfat.tistory.com/103

모든 트랜잭션이 같은 방식으로 동작하는 건 아니다. 전체가 같이 실패하거나 성공하는 하나의 작업으로 묶인다는 점에서는 다를바 없겠지만, 세밀히 따져보면 몇 가지 차이점이 있다. 스프링은 트랜잭션의 경계를 설정할 때 네 가지 트랜잭션 속성을 지정할 수 있다. 또, 선언적 트랜잭션에서는 롤백과 커밋의 기준을 변경하기 위해 두 가지 추가 속성을 지정할 수 있다. 선언적 트랜잭션 기준으로 보자면 모든 트랜잭션 경계는 여섯 가지 속성을 갖고 있는 셈이다.

트랜잭션 속성의 지정은 tx/aop 스키마의 태그를 이용하는 경우에는 다음과 같이 <tx:method> 태그의 애트리뷰트로 지정할 수 있다. <tx:method> 의 애트리뷰트는 메소드 이름 패턴을 담은 name 애트리뷰트를 제외하면 모두 디폴트 값이 정의되어 있으므로 생략가능하다.


<tx:attributes>

    <tx:method name="..."

               read-only="..."

               isolation="..."

               propatation="..."

               timeout="..."

               rollback-for="..."

               no-rollback-for="..." />

</tx:attributes>


@Transactional 을 이용했을 때는 다음과 같이 애노테이션의 앨리먼트로 트랜잭션 속성을 지정할 수 있다.


@Transactional(readOnly=...,

               isolation=...,

               propagation=...,

               timeout=...,

               rollbackFor=..., rollbackForClassName=...,

               noRollbackFor=..., noRollbackForClassName=...)


모든 앨리먼트는 디폴트 값이 정의되어 있으므로 생략 가능하다. 이제 트랜잭션 속성에 대해 자세히 알아보자.


트랜잭션 전파(propagation)


이제 트랜잭션을 시작하거나 기존 트랜잭션에 참여하는 방법을 결정하는 속성이다.선언적 트랜잭션 경계설정 방식의 장점은 여러 트랜잭션 적용 범위를 묶어서 커다란 트랜잭션 경계를 만들 수 있다는 점이다. 트랜잭션 경계의 시작 지점에서 트랜잭션 전파 속성을 참조해서 해당 범위의 트랜잭션을 어떤 식으로 진행시킬지 결정할 수 있다.


스프링이 지원하는 트랜잭션 전파 속성은 다음 여섯 가지가 있다. 모든 속성이 모든 종류의 트랜잭션 매니저와 데이터 액세스 기술에서 다 지원되진 않음을 주의해야 한다. 각 트랜잭션 매니저의 API문서에는 사용 가능한 트랜잭션 전파 속성이 설명되어 있으니 사용하기 전에 꼭 참고해 봐야 한다.


 <tx:method> 에서는 propagation 애트리뷰트 값으로, @Transactional 에서는 propagation 앨리먼트로 지정한다. propagation 앨리먼트의 이늄 값은 org.springframework.transaction.annotation.Propagation 에 정의된 것을 사용한다.


REQUIRED


디폴트 속성이다. 모든 트랜잭션 매니저가 지원하며, 대개 이속성이면 충분하다. 미리 시작된 트랜잭션이 있으면 참여하고 없으면 새로 시작한다. 자연스럽고 간단한 트랜잭션 전파 방식이지만 사용해보면 매우 강력하고 유용하다는 사실을 알 수 있다. 하나의 트랜잭션이 시작된 후에 다른 트랜잭션 경계가 설정된 메소드를 호출하면 자연스럽게 같은 트랜잭션으로 묶인다.


SUPPORTS


이미 시작된 트랜잭션이 있으면 참여하고 그렇지 않으면 트랜잭션 없이 진행하게 만든다. 트랜잭션이 없긴 하지만 해당 경계 안에서 Connection이나 하이버네이트 Session 등을 공유할 수 있다.


MANDATORY


REQUIRED와 비슷하게 이미 시작된 트랜잭션이 있으면 참여한다. 반면에 트랜잭션이 시작된 것이 없으면 새로 시작하는 대신 예외를 발생시킨다. 혼자서는 독립적으로 트랜잭션을 진행하면 안 되는 경우에 사용한다.


REQUIRES_NEW


항상 새로운 트랜잭션을 시작한다. 이미 진행 중인 트랜잭션이 있으면 트랜잭션을 잠시 보류시킨다. JTA 트랜잭션 매니저를 사용한다면 서버의 트랜잭션 매니저에 트랜잭션 보류가 가능하도록 설정되어 있어야 한다.


NOT_SUPPORTED


트랜잭션을 사용하지 않게 한다. 이미 진행 중인 트랜잭션이 있으면 보류시킨다.


NEVER


트랜잭션을 사용하지 않도록 강제한다. 이미 진행 중인 트랜잭션도 존재하면 안된다 있다면 예외를 발생시킨다.


NESTED


이미 진행중인 트랜잭션이 있으면 중첩 트랜잭션을 시작한다. 중첩 트랜잭션은 트랜잭션 안에 다시 트랜잭션을 만드는 것이다. 하지만 독립적인 트랜잭션을 마드는 REQUIRES_NEW와는 다르다.


중첩된 트랜잭션은 먼저 시작된 부모 트랜잭션의 커밋과 롤백에는 영향을 받지만 자신의 커밋과 롤백은 부모 트랝개션에게 영향을 주지 않는다. 예를 들어 어떤 중요한 작업을 진행하는 중에 작업 로그를 DB에 저장해야 한다고 해보자. 그런데 로그를 저장하는 작업이 실패하더라도 메인 작업의 트랜잭션까지는 롤백해서는 안되는 경우가 있다. 힘들게 처리한 시급한 작업을 단지 로그를 남기는 작업에 문제가 있다고 모두 실패로 만들 수는 없기 때문이다. 반면에 로그를 남긴 후에 핵심 작업에서 예외가 발생한다면 이때는 저장한 로그도 제거해야 한다. 바로 이럴 때 로그 작업을 메인 트랜잭션에서 분리해서 중첩 트랜잭션으로 만들어 두면 된다. 메인 트랜잭션이 롤백되면 중첩된 로그 트랜잭션도 같이 롤백되지만, 반대로 중첩된 로그 트랜잭션이 롤백돼도 메인 작업에 이상이 없다면 메인 트랜잭션은 정상적으로 커밋된다.


중첩 트랜잭션은 JDBC 3.0 스펙의 저장포인트(savepoint)를 지원하는 드라이버와 DataSourceTransactionManager 를 이용할 경우에 적용 가능하다. 또는 중첩 트랜잭션을 지원하는 일부 WAS의 JTA 트랜잭션 매니저를 이용할 때도 적용할 수 있다. 유용한 트랜잭션 전파 방식이지만 모든 트랜잭션 매니저에 다 적용 가능한 건 아니므로, 적용하려면 사용할 트랜잭션 매니저와 드라이버, WAS의 문서를 참조해 보고, 미리 학습 테스트를 만들어서 검증해봐야 한다.


트랜잭션 격리 수준(isolation)


트랜잭션 격리수준은 동시에 여러 트랜잭션이 진행될 때에 트랜잭션의 작업 결과를 여타 트랜잭션에게 어떻게 노출할 것인지를 결정하는 기준이다. 스프링은 다음 다섯 가지 격리수준 속성을 지원한다.


격리수준은 <tx:method>의 isolation 애트리뷰트와 @Transactional 의 isolation 앨리먼트로 지정할 수 있다.


DEFAULT


사용하는 데이터 액세스 기술 또는 DB 드라이버의 디폴트 설정을 따른다. 보통 드라이버의 격리수준은 DB의 격리수준을 따르는게 일반적이다. 대부분의 DB는 READ_COMMITTED를 기본 격리수준으로 갖는다. 하지만 일부 DB는 디폴트 값이 다른 경우도 있으므로 DEFAULT를 사용할 경우에는 드라이버와 DB의 문서를 참고해서 디폴트 격리수준을 확인해야 한다.


READ_UNCOMMITTED


가장 낮은 격리수준이다. 하나의 트랜잭션이 커밋되기 전에 그 변화가 다른 트랜잭션에 그대로 노출되는 문제가 있다. 하지만 가장 빠르기 때문에 데이터의 일관성이 조금 떨어지더라도 성능을 극대화할 때 의도적으로 사용하기도 한다.


READ_COMMITTED


실제로 가장 많이 사용되는 격리수준이다. 물론 스프링에서는 DEFAULT로 설정해둬도 DB의 기본 격리수준을 따라서 READ_COMMITTED로 동작하는 경우가 대부분이므로 명시적으로 설정하지 않기도 한다. READ_UNCOMMITTED와 달리 다른 트랜잭션이 커밋하지 않은 정보는 읽을 수 없다. 대신 하나의 트랜잭션이 읽은 로우를 다른 트랜잭션이 수정할 수 있다. 이 때문에 처음 트랜잭션이 같은 로우를 읽을 경우 다른 내용이 발견될 수 있다.


REPEATABLE_READ


하나의 트랜잭션이 읽은 로우를 다른 트랜잭션이 수정하는 것을 막아준다. 하지만 새로운 로우를 추가하는 것은 제한하지 않는다. 따라서 SELECT로 조건에 맞는 로우를 전부 가져오는 경우 트랜잭션이 끝나기 전에 추가된 로우가 발견될 수 있다.


SERIALIZABLE


가장 강력한 트랜잭션 격리수준이다. 이름 그대로 트랜잭션을 순차적으로 진행시켜 주기 때문에 여러 트랜잭션이 동시에 같은 테이블의 정보를 액세스하지 못한다. 가장 안전한 격리수준이지만 가장 성능이 떨어지기 때문에 극단적인 안전한 작업이 필요한 경우가 아니라면 자주 사용되지 않는다.


트랜잭션 제한시간(timeout)


이 속성을 이용하면 트랜잭션에 제한시간을 지정할 수 있다. 값은 초 단위로 지정한다. 디폴트는 트랜잭션 시스템의 제한시간을 따르는 것이다. 트랜잭션 제한시간을 직접 지정하는 경우 이 기능을 지원하지 못하는 일부 트랜잭션 매니저는 예외를 발생시킬 수 있다.


XML에서는 <tx:method> 의 timeout 애트리뷰트를 이용하고 @Transactional 애노테이션에는 timeout 엘리먼트로 지정할 수 있다.


읽기전용 트랜잭션(read-only, readOnly)


트랜잭션을 읽기 전용으로 설정할 수 있다. 성능을 최적화하기 위해 사용할 수도 있고 특정 트랜잭션 작업 안에서 쓰기 작업이 일어나는 것을 의도적으로 방지하기 위해 사용할 수도 있다. 트랜잭션을 준비하면서 읽기 전용 속성이 트랜잭션 매니저에게 전달된다. 그에 따라 트랜잭션 매니저가 적절한 작업을 수행한다. 그런데 일부 트랜잭션 매니저의 경우 읽기전용 속성을 무시하고 쓰기 작업을 허용할 수도 있기 때문에 주의해야 한다. 일반적으로 읽기 전용 트랜잭션이 시작된 이후 INSERT, UPDATE, DELETE 같은 쓰기 작업이 진행되면 예외가 발생한다. 


aop/tx 스키마로 트랜잭션 선언을 할 때는 이름 패턴을 이용해 읽기 전용 속성으로 만드는 경우가 많다. 보통 get이나 find 같은 이름의 메소드를 모두 읽기전용으로 만들어 사용하면 편리하다. @Transactional 의 경우는 각 메소드에 일일이 읽기 전용 지정을 해줘야 한다.


read-only 애트리뷰트 또는 readOnly 앨리먼트로 지정한다.


트랜잭션 롤백 예외(rollback-for, rollbackFor, rollbackForClassName)


선언적 트랜잭션에서는 런타임 예외가 발생하면 롤백한다. 반면에 예외가 전혀 발생하지 않거나 체크 예외가 발생하면 커밋한다. 체크 예외를 커밋 대상으로 삼은 이유는 체크 예외가 예외적인 상황에서 사용되기보다는 리턴 값을 대신해서 비즈니스적인 의미를 담은 결과를 돌려주는 용도로 많이 사용되기 때문이다. 스프링에서는 데이터 액세스 기술의 예외는 런타임 예외로 전환돼서 던져지므로 런타임 예외만 롤백 대상으로 삼은 것이다.


하지만 원한다면 기본 동작방식을 바꿀 수 있다. 체크 예외지만 롤백 대상으로 삼아야 하는 것이 있다면 XML의 rolback-for 애트리뷰트나 애노테이션의 rollbackFor 또는 rollbackForClassName 앨리먼트를 이용해서 예외를 지정하면 된다. 


rollback-for 나 rollbackForClassName 은 예외 이름을 넣으면 되고, rollbackFor 는 예외 클래스를 직접 넣는다.


<tx:method> 라면 다음과 같이 지정하면 된다.


<tx:method name="get*" read-only="true" rollback-for="NoSuchMemberException" />


@Transactional 에서는 다음과 같이 클래스 이름 대신 클래스를 직접 사용해도 된다.


@Transactional(readOnly=true, rollbackFor=NoSuchMemberException.class)


트랜잭션 커밋 예외


(no-rollback-for, noRollbackFor, noRollbackForClassName)


rollback-for 속성과는 반대로 기본적으로는 롤백 대상인 런타임 예외를 트랜잭션 커밋 대상으로 지정해 준다.


사용 방법은 rollback-for 와 동일하다.


이 여섯가지 트랜잭션 속성은 모든 트랜잭션 경계설정 속성에 사용할 수 있다. 하지만 모든 트랜잭션마다 일일이 트랜잭션 속성을 지정하는 건 매우 번거롭고 불편한 일이다. 세밀하게 튜닝해야 하는 시스템이 아니라면 메소드 이름 패턴을 이용해서 트랜잭션 속성을 한 번에 지정하는 aop/tx 스키마 태그 방식이 편리하다. 보통은 read-only 속성 정도만 사용하고 나머지는 디폴트로 지정하는 경우가 많다. 세밀한 속성은 DB나 WAS의 트랜잭션 매니저의 설정을 이용해도 되기 때문이다.


세밀한 트랜잭션 속성 지정이 필요한 경우에는 @Transactional 을 사용하는 편이 좋다. 대신 트랜잭션 속성이 전체적으로 어떻게 지정되어 있는지 한눈에 보기 힘들다는 단점이 있고, 개발자가 코드를 만들 때 트랜잭션 속성을 실수로 잘못 지정하는 등의 위험이 있기 때문에 사전에 트랜잭션 속성 지정에 관한 정책이나 가이드라인을 잘 만들어 둬야 한다.

1. getSession(), getSession(true)

 - HttpSession이 존재하면 현재 HttpSession을 반환하고 존재하지 않으면 새로이 세션을 생성합니다


2. getSession(false)

 - HttpSession이 존재하면 현재 HttpSession을 반환하고 존재하지 않으면 새로이 생성하지 않고 그냥 null을 반환합니다


3. 사용 예

HttpSession session = request.getSession();

HttpSession session = request.getSession(true);

위는 동일한 결과를 반환합니다

새로 생성된 놈인지 확인은 session.isNew() 로 가능합니다

그리고 getSession(), getSession(true)는 null 체크없이 바로 getAttribute()를 사용해도 무방하지만, getSession(false)는 null을 리턴할수 있기 때문에 null체크를 해야 합니다.

HttpSession session = request.getSession(false);

if (session != null)

    User user = (User) session.getAttribute("User");

Spring + ibatis/mybatis 연동에 필요한 JDBC 라이브러리 파일들을 

각 DBMS별로 pom.xml에 등록을 위한 포스팅 해보도록 하겠습니다.


연동하고자 하는 JDBC 라이브러리는 

MySQL, Oracle, MSSQL JDBC를 메이븐을 통해서 받도록 하겠습니다.


먼저 Maven에서 기본적으로 제공해주는 MySQL JDBC 라이브러리를 등록해보도록 하겠습니다.


MySQL JDBC Dependency 등록


1
2
3
4
5
<dependency>
    <groupId>mysql</groupId>
    <artifactId>mysql-connector-java</artifactId>
    <version>5.1.31</version>
</dependency>


상단 코드를 작성하고 저장을 해주셨다면 


Properties -> Java Build Path -> Libraries탭에서 Maven Dependencies를 확인 해보시면  

MySQL JDBC가 등록된 것을 확인하실 수 있을겁니다.


ORACLE JDBC Dependency 등록


ojdbc jar 파일을 Maven Repository 사이트에서 검색하여 나오는 dependency로는 라이브러리 다운로드를 받을 수 없습니다.


1
2
3
4
5
<dependency>
    <groupId>ojdbc</groupId>
    <artifactId>ojdbc</artifactId>
    <version>14</version>
</dependency>


"Missing artifact ojdbc:ojdbc:jar:14" 에러가 날 것이므로 

상단 코드 대신 다른 dependency를 등록 해주도록 합니다.


1
2
3
4
5
<dependency>
    <groupId>com.oracle</groupId>
    <artifactId>ojdbc14</artifactId>
     <version>10.2.0.4.0</version>
</dependency>


위코드를 작성하셔도 아직은 dependency 코드부분에 여전히 

"Missing artifact com.oracle:ojdbc14:jar:10.2.0.4.0" 오류가 나타날 것입니다.

<properties> 바로 위에 다음코드를 추가해주세요


1
2
3
4
5
6
<repositories>
    <repository>
        <id>mesir-repo</id>
    </repository>
</repositories>


그럼 오라클의 dependency 오류는 사라질 것이며

다음처럼 ojdbc14.jar 라이브러리가 등록될 것입니다.


MSSQL JDBC Dependency 등록


MSSQL JDBC 연동을 위한 라이브러리인 sqljdbc는 메이븐에서 제공을 하지 않아 

별도로 로컬상의 Maven repository로 연동이 되어야 합니다.


제일먼저 SQL Server용 JDBC 를 다운로드 받도록 합니다.


http://www.microsoft.com/ko-kr/download/details.aspx?id=11774


상단 URL 접속 후 다운로드 버튼을 클릭합니다.


윈도우 기준으로 설명하기에 exe 파일 체크 후 Next버튼을 클릭하여 파일다운로드를 받았습니다.


다운로드 받은 exe파일을 실행을 합니다.


Unzip해준 경로를 보면 sqljdbc_4.0 디렉토리가 생성되어있습니다.

kor 디렉토리를 들어가시면 sqljdbc.jar 파일과 sqljdbc4.jar 파일이 존재하는데 아마 요즘 프로젝트들은

JRE 6.0 이상의 환경에서 작업하므로 sqljdbc4.jar 파일을 등록시켜주면 될겁니다.


아파치 메이븐으로 install 해주기위하여 

하단 사이트에 접속하여 메이븐 파일을 다운로드 받도록 합니다.


http://maven.apache.org/download.cgi


압축을 해제 후 CMD 창을 띄워줍니다.


다운받아서 해제한 apache-maven의 bin디렉토리까지 이동을 합니다.


다음 명령어를 실행합니다.


1
mvn install:install-file -Dfile=D:\sqljdbc_4.0\kor\sqljdbc4.jar -Dpackaging=jar -DgroupId=com.microsoft.sqlserver -DartifactId=sqljdbc4 -Dversion=4.0


1
2
3
4
5
6
7
8
9
10
11
12
13
14
15
16
17
[INFO] Scanning for projects...
[INFO]
[INFO] ------------------------------------------------------------------------
[INFO] Building Maven Stub Project (No POM) 1
[INFO] ------------------------------------------------------------------------
[INFO]
[INFO] --- maven-install-plugin:2.4:install-file (default-cli) @ standalone-pom
---
[INFO] Installing D:\sqljdbc_4.0\kor\sqljdbc4.jar to C:\Users\jgh\.m2\repository
\com\microsoft\sqlserver\sqljdbc4\4.0\sqljdbc4-4.0.jar
[INFO] ------------------------------------------------------------------------
[INFO] BUILD SUCCESS
[INFO] ------------------------------------------------------------------------
[INFO] Total time: 0.960 s
[INFO] Finished at: 2014-11-14T01:23:05+09:00
[INFO] Final Memory: 5M/15M
[INFO] ------------------------------------------------------------------------


로그가 출력되면 정상 설치 된것입니다.

그럼 MSSQL JDBC 라이브러리 Dependency를 등록해보도록 하겠습니다.


1
2
3
4
5
<dependency>
    <groupId>com.microsoft.sqlserver</groupId>
    <artifactId>sqljdbc4</artifactId>
    <version>4.0</version>
</dependency>


위와같이 pom.xml에 등록해주면 오류없이 정상적으로 라이브러리 추가가 된 것을 확인 할 수 있습니다.


MySQL, Oracle, MSSQL JDBC 라이브러리 파일을 pom.xml에 등록하는 방법에 대하여 포스팅해보았습니다.


다음장은 spring3 + mybatis 연동설정에 대하여 포스팅하도록 하겠습니다.


1. 설치

STS는 스피링을 사용하는 개발자에게 특화된 Eclipse 기반의 IDE이다.

다운로드는 아래 링크를 통해 받을 수 있다.


Spring Boot 프로젝트는 Spring의 경량화 버전이다.

기본적으로 Tomcat을 내장하고 있어 프로젝트를 구동하기 편하다.


https://spring.io/tools


2. 프로젝트 만들기


Package Explorer에서 오른쪽 버튼을 클릭하고

New - Sping Starer Project를 선택한다.


선택하면 아래와 같은 팝업이 뜨는데

Name과 Artifact는 프로젝트를 유니크하게 구별하는 식별자이다.


입맛에 맞게 설정해주자.


다음은 이 프로젝트에서 사용할 모듈설정 화면이다.

여기서는 Web 정도만 선택한다.

추후 Pom.xml에서 추가할 수 있다.


처음 프로젝트를 생성하면 프로젝트 구조는 아래와 같다.


여기서 Controller를 만들기 위해

Controller Package를 만들고 그 아래 HelloWorldContoller Class를 하나 만든 다음

아래와 같이 코딩하자.


중요한 점은 public class위에 

@RestController 를 달았다는 것과


public String HelloWolrd위에 

@RequestMapping 를 달았다는 것이다.


이 2가지 Annotation은 

컨트롤러를 구성하는데 꼭 필요한 요소로


Controller로 쓰는 클래스위에는

Controller는 URL을 입력했을 떄 처음 그 요청을 받아 처리해주는 로직을 담은

클래스 정도로 생각하면 된다.


아래와 같이 RestController Annotation을 붙여주고

URL을 매핑 시켜주는 RequstMapping Annotation을 통해

그 내부를 구성한다.


이렇게 한다음 Rus As - Spring boot App을 눌러 프로젝트를 구동시키고

웹 브라우져로 위에 적은 URL대로 Request를 해보면

아래와 같은 메시지가 뜨는 것을 볼수 있다.


리턴은 Vo로도 가능하다.

Vo를 리턴하면 Json형식으로 리턴된다.


Spring Web MVC offers seamless integration with different view technologies, including Excel document view. When configured properly, a Spring’s view resolver can generate an Excel document from model data and send it to the client for downloading or opening by a spreadsheet program like Microsoft Excel. For working with Excel view, Spring supports two popular libraries such as Apache POI and JExcelApi (Both are free and open source). This tutorial is going to help you in understanding how to configure Spring MVC to work with these libraries in order to deliver dynamic content in form of Excel document to the users, by developing a sample Spring MVC application that allows the users to download an Excel document generated on the fly:

Spring MVC Excel View Demo with Apache POI

Clicking on the download link will prompt the users for downloading/opening the document which looks like the following screenshot in Microsoft Excel program:

Open downloaded Excel document in MS Excel

About Apache POI

Apache POI is a set of pure Java libraries for reading and writing Microsoft Office documents such as Word, Excel, Powerpoint, Outlook, etc. Click the following link to download its latest distribution (which is Apache POI 3.9, as of this writing):

Apache POI Download

The distribution comes with several jar files, but the only the poi-VERSION.jar file is required for typical usage of generating Excel documents (if you want to generate Excel XML format such as *.xlsx files, use the poi-ooxml-VERSION.jarfile).

To generate an Excel document using Apache POI within Spring, we need to create a view class that extends from theAbstractExcelView class and override its method buildExcelDocument(). Then using Apache POI’s Excel API to generate the excel document.

About JExcelApi

JExcelApi is a Java library that is dedicated for reading, writing and modifying Excel spreadsheets. It supports Excel 2003 file format and older versions. You can download JExcelApi from the following link:

               JExcelApi DownloadTo work with JExcelApi, you need to add its only jar file: jxl.jar - to your project’s classpath. And Spring provides an abstract class called AbstractJExcelView which should be extended to generate an Excel document using JExcelApi, similarly to the case of Apache POI.

This tutorial will use Apache POI for the sample application. However, you can also download a JExcelApi version of the project in the Attachments section.

In Eclipse IDE, create a Dynamic Web Project called SpringMvcExcelViewDemo. We will end up with the following project structure:

Spring MVC Excel View Demo Eclipse project structure

The jar files used are:

      • spring-beans-3.2.3.RELEASE.jar
      • spring-context-3.2.3.RELEASE.jar
      • spring-context-support-3.2.3.RELEASE.jar
      • spring-core-3.2.3.RELEASE.jar
      • spring-expression-3.2.3.RELEASE.jar
      • spring-web-3.2.3.RELEASE.jar
      • spring-webmvc-3.2.3.RELEASE.jar
      • commons-logging-1.1.1.jar
    • Apache POI:
      • poi-3.9-20121203.jar
 

This book: Getting started with Spring Framework  helps you master all major concepts like Spring core modules, dependency injection, Spring AOP, annotation-driven development, and more.


1. Creating Model Class

We will generate an Excel document that contains a list of Java books, so create the following model class (Book.java):

1
2
3
4
5
6
7
8
9
10
11
12
13
14
15
16
17
18
19
20
21
package net.codejava.spring;
 
public class Book {
    private String title;
    private String author;
    private String isbn;
    private String publishedDate;
    private float price;
 
    public Book(String title, String author, String isbn, String publishedDate,
            float price) {
        this.title = title;
        this.author = author;
        this.isbn = isbn;
        this.publishedDate = publishedDate;
        this.price = price;
    }
 
    // getters and setters
 
}


2. Coding Entry JSP Page

We need to create a JSP page that displays a hyperlink on which the users will click to download the Excel file. Create a folder called jsp inside WEB-INF directory and create a JSP file called home.jsp under WEB-INF\jsp with the following content:

1
2
3
4
5
6
7
8
9
10
11
12
13
14
15
16
<%@ page language="java" contentType="text/html; charset=UTF-8"
    pageEncoding="UTF-8"%>
<!DOCTYPE html PUBLIC "-//W3C//DTD HTML 4.01 Transitional//EN"
    "http://www.w3.org/TR/html4/loose.dtd">
<html>
<head>
<meta http-equiv="Content-Type" content="text/html; charset=UTF-8">
<title>Spring MVC Excel View Demo (Apache POI)</title>
</head>
<body>
    <div align="center">
        <h1>Spring MVC Excel View Demo (Apache POI)</h1>
        <h3><a href="/downloadExcel">Download Excel Document</a></h3>
    </div>
</body>
</html>
The hyperlink Download Excel Document points to a relative URL downloadExcel which will be handled by a Spring controller class as described below.


3. Coding Spring Controller

Create a Spring controller class called MainController with the following code:

1
2
3
4
5
6
7
8
9
10
11
12
13
14
15
16
17
18
19
20
21
22
23
24
25
26
27
28
29
30
31
32
33
34
35
36
37
38
39
40
41
42
43
44
45
46
47
48
49
50
package net.codejava.spring;
 
import java.util.ArrayList;
import java.util.List;
 
import org.springframework.stereotype.Controller;
import org.springframework.web.bind.annotation.RequestMapping;
import org.springframework.web.bind.annotation.RequestMethod;
import org.springframework.web.servlet.ModelAndView;
 
/**
 * A Spring controller that allows the users to download an Excel document
 * generated by the Apache POI library.
 *
 * @author www.codejava.net
 *
 */
@Controller
public class MainController {
 
    /**
     * Handle request to the default page
     */
    @RequestMapping(value = "/", method = RequestMethod.GET)
    public String viewHome() {
        return "home";
    }
 
    /**
     * Handle request to download an Excel document
     */
    @RequestMapping(value = "/downloadExcel", method = RequestMethod.GET)
    public ModelAndView downloadExcel() {
        // create some sample data
        List<Book> listBooks = new ArrayList<Book>();
        listBooks.add(new Book("Effective Java""Joshua Bloch""0321356683",
                "May 28, 2008"38.11F));
        listBooks.add(new Book("Head First Java""Kathy Sierra & Bert Bates",
                "0596009208""February 9, 2005"30.80F));
        listBooks.add(new Book("Java Generics and Collections",
                "Philip Wadler""0596527756""Oct 24, 2006"29.52F));
        listBooks.add(new Book("Thinking in Java""Bruce Eckel""0596527756",
                "February 20, 2006"43.97F));
        listBooks.add(new Book("Spring in Action""Craig Walls""1935182358",
                "June 29, 2011"31.98F));
 
        // return a view which will be resolved by an excel view resolver
        return new ModelAndView("excelView""listBooks", listBooks);
    }
}
As we can see, this controller class implements two request handling methods:

    • viewHome(): this method simply returns a logical view name “home” which will be resolved to the home.jsp page (We will configure view resolver for JSP later).
    • downloadExcel(): this method creates some dummy data, e.g. creating some books and add them to a list. Finally this method returns a logical view name “excelView” and passes the list of books as the name “listBooks” to the model. We will configure an Excel view class for this view later.  

This book: Spring in Action  helps you learn the latest features, tools, and practices including Spring MVC, REST, Security, Web Flow, and more.


4. Coding Excel View Class

To generate an Excel document from the model data passed by the controller, create a subclass of the AbstractExcelViewclass as follows:

1
2
3
4
5
6
7
8
9
10
11
12
13
14
15
16
17
18
19
20
21
22
23
24
25
26
27
28
29
30
31
32
33
34
35
36
37
38
39
40
41
42
43
44
45
46
47
48
49
50
51
52
53
54
55
56
57
58
59
60
61
62
63
64
65
66
67
68
69
70
71
72
73
74
75
76
77
package net.codejava.spring;
 
import java.util.List;
import java.util.Map;
 
import javax.servlet.http.HttpServletRequest;
import javax.servlet.http.HttpServletResponse;
 
import org.apache.poi.hssf.usermodel.HSSFFont;
import org.apache.poi.hssf.usermodel.HSSFRow;
import org.apache.poi.hssf.usermodel.HSSFSheet;
import org.apache.poi.hssf.usermodel.HSSFWorkbook;
import org.apache.poi.hssf.util.HSSFColor;
import org.apache.poi.ss.usermodel.CellStyle;
import org.apache.poi.ss.usermodel.Font;
import org.springframework.web.servlet.view.document.AbstractExcelView;
 
/**
 * This class builds an Excel spreadsheet document using Apache POI library.
 * @author www.codejava.net
 *
 */
public class ExcelBuilder extends AbstractExcelView {
 
    @Override
    protected void buildExcelDocument(Map<String, Object> model,
            HSSFWorkbook workbook, HttpServletRequest request, HttpServletResponse response)
            throws Exception {
        // get data model which is passed by the Spring container
        List<Book> listBooks = (List<Book>) model.get("listBooks");
         
        // create a new Excel sheet
        HSSFSheet sheet = workbook.createSheet("Java Books");
        sheet.setDefaultColumnWidth(30);
         
        // create style for header cells
        CellStyle style = workbook.createCellStyle();
        Font font = workbook.createFont();
        font.setFontName("Arial");
        style.setFillForegroundColor(HSSFColor.BLUE.index);
        style.setFillPattern(CellStyle.SOLID_FOREGROUND);
        font.setBoldweight(HSSFFont.BOLDWEIGHT_BOLD);
        font.setColor(HSSFColor.WHITE.index);
        style.setFont(font);
         
        // create header row
        HSSFRow header = sheet.createRow(0);
         
        header.createCell(0).setCellValue("Book Title");
        header.getCell(0).setCellStyle(style);
         
        header.createCell(1).setCellValue("Author");
        header.getCell(1).setCellStyle(style);
         
        header.createCell(2).setCellValue("ISBN");
        header.getCell(2).setCellStyle(style);
         
        header.createCell(3).setCellValue("Published Date");
        header.getCell(3).setCellStyle(style);
         
        header.createCell(4).setCellValue("Price");
        header.getCell(4).setCellStyle(style);
         
        // create data rows
        int rowCount = 1;
         
        for (Book aBook : listBooks) {
            HSSFRow aRow = sheet.createRow(rowCount++);
            aRow.createCell(0).setCellValue(aBook.getTitle());
            aRow.createCell(1).setCellValue(aBook.getAuthor());
            aRow.createCell(2).setCellValue(aBook.getIsbn());
            aRow.createCell(3).setCellValue(aBook.getPublishedDate());
            aRow.createCell(4).setCellValue(aBook.getPrice());
        }
    }
 
}
 

For working with JExcelApi, make the class extends the AbstractJExcelView class like this:

1
2
3
4
5
6
7
8
9
10
11
12
13
14
15
16
17
18
19
20
21
22
23
24
25
26
27
28
29
30
31
32
33
34
35
36
37
38
39
40
41
42
43
44
45
46
47
48
49
50
51
52
53
package net.codejava.spring;
 
import java.util.List;
import java.util.Map;
 
import javax.servlet.http.HttpServletRequest;
import javax.servlet.http.HttpServletResponse;
 
import jxl.write.Label;
import jxl.write.WritableSheet;
import jxl.write.WritableWorkbook;
 
import org.springframework.web.servlet.view.document.AbstractJExcelView;
 
/**
 * This class builds an Excel spreadsheet document using JExcelApi library.
 * @author www.codejava.net
 *
 */
public class ExcelBuilder extends AbstractJExcelView {
 
    @Override
    protected void buildExcelDocument(Map<String, Object> model,
            WritableWorkbook workbook, HttpServletRequest request,
            HttpServletResponse response) throws Exception {
         
        // get data model which is passed by the Spring container
        List<Book> listBooks = (List<Book>) model.get("listBooks");
         
        // create a new Excel sheet
        WritableSheet sheet = workbook.createSheet("Java Books"0);
         
        // create header row
        sheet.addCell(new Label(00"Book Title"));
        sheet.addCell(new Label(10"Author"));
        sheet.addCell(new Label(20"ISBN"));
        sheet.addCell(new Label(30"Published Date"));
        sheet.addCell(new Label(40"Price"));
         
        // create data rows
        int rowCount = 1;
         
        for (Book aBook : listBooks) {
            sheet.addCell(new Label(0, rowCount, aBook.getTitle()));
            sheet.addCell(new Label(1, rowCount, aBook.getAuthor()));
            sheet.addCell(new Label(2, rowCount, aBook.getIsbn()));
            sheet.addCell(new Label(3, rowCount, aBook.getPublishedDate()));
            sheet.addCell(new jxl.write.Number(4, rowCount, aBook.getPrice()));
             
            rowCount++;
        }
    }
}
The above code is self-explanatory. As you can see, there are some differences between the Apache POI API and the JExcelApi.


See more: How to Write Excel Files in Java using Apache POI


This book: Spring Integration in Action help you learn more about enterprise integration and messaging using the Spring Integration framework.


5. Configuring Excel View Class

Next, we need to tell Spring to use the above ExcelBuilder class as view class for the view name “excelView” returned from the controller’s downloadExcel() method. There are two ways to do this by creating either a .properties file or an XML file.

Using views.properties file:

Create a .properties file called views.properties under the project’s classpath (which is under src directory in the Eclipse project), with the following line:

1
excelView.(class)=net.codejava.spring.ExcelBuilder
That tells the Spring’s view resolver to use the net.codejava.spring.ExcelBuilder class to process output for the view name “excelView”.


Using views.xml file:

An alternative to the views.properties file is to use XML version. Create views.xml file under WEB-INF directory with the following content:

1
2
3
4
5
6
7
8
9
<?xml version="1.0" encoding="UTF-8"?>
<beans xmlns="http://www.springframework.org/schema/beans"
    xmlns:xsi="http://www.w3.org/2001/XMLSchema-instance"
    xsi:schemaLocation="http://www.springframework.org/schema/beans
    http://www.springframework.org/schema/beans/spring-beans-3.0.xsd">
     
    <bean id="excelView" class="net.codejava.spring.ExcelBuilder" />
     
</beans>
Note that the bean’s ID attribute must correspond to the view name “excelView”.


6. Writing Spring Configuration File

Create a Spring configuration file named spring-mvc.xml under WEB-INF directory. In case you are usingviews.properties file, put the following content:

1
2
3
4
5
6
7
8
9
10
11
12
13
14
15
16
17
18
19
20
21
22
23
24
<?xml version="1.0" encoding="UTF-8"?>
<beans xmlns="http://www.springframework.org/schema/beans"
    xmlns:xsi="http://www.w3.org/2001/XMLSchema-instance"
    xmlns:context="http://www.springframework.org/schema/context"
    xsi:schemaLocation="http://www.springframework.org/schema/beans
    http://www.springframework.org/schema/beans/spring-beans-3.0.xsd
    http://www.springframework.org/schema/context
    http://www.springframework.org/schema/context/spring-context-3.0.xsd">
 
    <context:component-scan base-package="net.codejava.spring" />
 
   <bean id="viewResolver1" class="org.springframework.web.servlet.view.ResourceBundleViewResolver">
        <property name="order" value="1"/>
        <property name="basename" value="views"/>
    </bean>
     
    <bean id="viewResolver2"
        class="org.springframework.web.servlet.view.InternalResourceViewResolver">
        <property name="order" value="2"/>
        <property name="prefix" value="/WEB-INF/jsp/" />
        <property name="suffix" value=".jsp" />
    </bean>
     
</beans>
As seen in the above configuration, there are two view resolvers used here:

    • ResourceBundleViewResolver: to resolve view names specified in the views.properties file.
    • InternalResourceViewResolver: to resolve view names to JSP pages.
The order property does matter here, in which the first resolver has higher priority than the second one.


In case the views.xml is used, configure Spring as follows:

1
2
3
4
5
6
7
8
9
10
11
12
13
14
15
16
17
18
19
20
21
22
23
24
25
<?xml version="1.0" encoding="UTF-8"?>
<beans xmlns="http://www.springframework.org/schema/beans"
    xmlns:xsi="http://www.w3.org/2001/XMLSchema-instance"
    xmlns:context="http://www.springframework.org/schema/context"
    xsi:schemaLocation="http://www.springframework.org/schema/beans
    http://www.springframework.org/schema/beans/spring-beans-3.0.xsd
    http://www.springframework.org/schema/context
    http://www.springframework.org/schema/context/spring-context-3.0.xsd">
 
    <context:component-scan base-package="net.codejava.spring" />
 
   <bean id="viewResolver1" class="org.springframework.web.servlet.view.XmlViewResolver">
        <property name="order" value="1"/>
        <property name="location" value="/WEB-INF/views.xml"/>
    </bean>
     
    <bean id="viewResolver2"
        class="org.springframework.web.servlet.view.InternalResourceViewResolver">
        <property name="order" value="2"/>
        <property name="prefix" value="/WEB-INF/jsp/" />
        <property name="suffix" value=".jsp" />
    </bean>
 
     
</beans>
 

Discover how to write efficient batch applications with Spring Batch in Action


7. Configuring Spring MVC in web.xml

The final step is to configure Spring MVC in the web deployment descriptor file as follows:

1
2
3
4
5
6
7
8
9
10
11
12
13
14
15
16
17
18
19
20
21
22
23
24
25
<?xml version="1.0" encoding="UTF-8"?>
<web-app xmlns:xsi="http://www.w3.org/2001/XMLSchema-instance"
    xmlns="http://java.sun.com/xml/ns/javaee"
    xmlns:web="http://java.sun.com/xml/ns/javaee/web-app_2_5.xsd"
    xsi:schemaLocation="http://java.sun.com/xml/ns/javaee
        http://java.sun.com/xml/ns/javaee/web-app_3_0.xsd"
    id="WebApp_ID" version="3.0">
     
    <display-name>SpringMvcExcelViewDemo</display-name>
     
    <servlet>
        <servlet-name>SpringController</servlet-name>
        <servlet-class>org.springframework.web.servlet.DispatcherServlet</servlet-class>
        <init-param>
            <param-name>contextConfigLocation</param-name>
            <param-value>/WEB-INF/spring-mvc.xml</param-value>
        </init-param>
        <load-on-startup>1</load-on-startup>
    </servlet>
 
    <servlet-mapping>
        <servlet-name>SpringController</servlet-name>
        <url-pattern>/</url-pattern>
    </servlet-mapping
</web-app>


8. Testing the application

Type the following URL into browser to access the application we’ve built:

http://localhost:8080/SpringMvcExcelViewDemo/

The default page (home.jsp) gets displayed (in FireFox):

Test Spring MVC Excel View Demo in Firefox

Click on the “Download Excel Document” link, the browser will ask for opening or saving the file:

Opening downloadExcel dialog

Select Open with (Microsoft Office Excel), the document gets opened in Excel as follows:

Open downloaded Excel document in MS Excel


Download Eclipse project for this application in the Attachments section below


출처 : http://www.codejava.net/frameworks/spring/spring-mvc-with-excel-view-example-apache-poi-and-jexcelapi


<!-- 로그인 세션 60분 x 3 = 3시간 설정 -->

<session-config>

<session-timeout>180</session-timeout>

</session-config>


<!-- 404, 500, 501 에러에대한 jsp error 페이지 설정 -->

<error-page>

<error-code>404</error-code>

<location>/WEB-INF/jsp/common/error/error404.jsp</location>

</error-page>

<error-page>

<error-code>500</error-code>

<location>/WEB-INF/jsp/common/error/error404.jsp</location>

</error-page>

<error-page>

<error-code>501</error-code>

<location>/WEB-INF/jsp/common/error/error404.jsp</location>

</error-page>


<!-- http 요청 메소드 제한 설정 : DELETE, PUT, OPTIONS, TRACE, PATCH 대한 메소드 막음 -->

<security-constraint>

<web-resource-collection>

<web-resource-name>NoAccess</web-resource-name>

<url-pattern>*.do</url-pattern>

<http-method>DELETE</http-method>

<http-method>PUT</http-method>

<http-method>OPTIONS</http-method>

<http-method>TRACE</http-method>

<http-method>PATCH </http-method>

</web-resource-collection>

<auth-constraint />

</security-constraint>


<!-- index 페이지 설정 -->

<welcome-file-list>

<welcome-file>welcome.jsp</welcome-file>

<welcome-file>index.jsp</welcome-file>

</welcome-file-list>


참고 URL


https://github.com/wikibook/springmaven/


+ Recent posts